Preparing for a test
What to bring
- Pathology test request form completed by your doctor
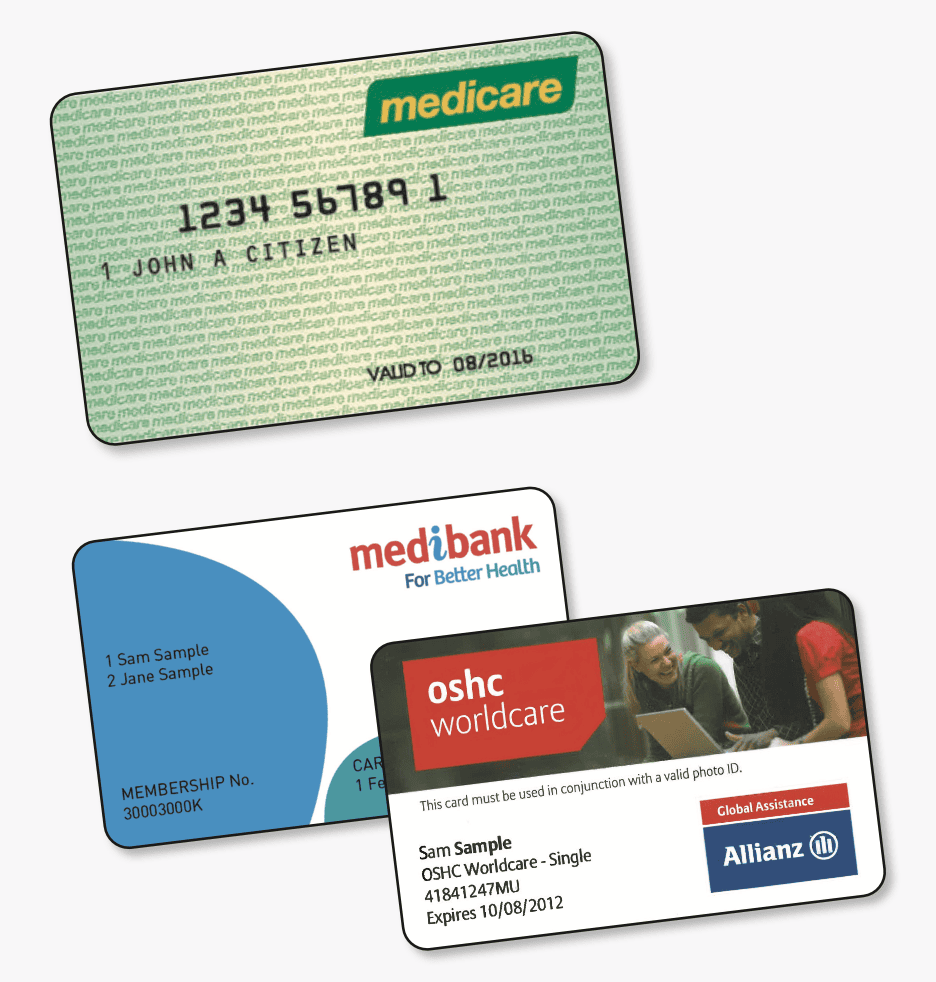
- A valid Medicare card and/or Private Health Insurance card , or overseas healthcard card (OSHC) and photo ID – this will ensure your testing is billed to Medicare or your healthcare provider if eligible
- A list of any current medication and doses
- You will also need to bring photo ID if you are having a test for any of the following reasons:
- You are an overseas healthcare card holder
- Immigration
- Occupational Health
- Parentage DNA
- Insurance
- Drug Screening
- Court Ordered Testing
What to do before your test
Your pre-testing instructions will depend on the test you’re having, but the most important thing to do is drink plenty of water before your test – unless your GP has given you a reason not to. This will make it easier for our team member to conduct your blood test.
In some cases, you may be required to fast before your test. This means you will not be able to eat or drink for a set period of time. Fasting is necessary for some tests because some foods and drinks can affect your results.
Your doctor will advise if you are required to fast for your blood test.
A quick guide to fasting
- Diabetics should not fast without prior medical advice.
- Fasting means that you abstain from all food and fluids other than water for a period of 8-16 hours prior to your test.
- Alcohol should not be consumed for 72 hours (3 days) prior to the test.
- You should avoid smoking during the fasting period.
- Do not fast for more than 16 hours prior to your testing.
- Continue to take any medication unless advised otherwise by your doctor.
- Children under 12 should avoid fasting for more than 4-6 hours.
Tests that may require fasting include
- Glucose levels
- Lipids levels (cholesterol)
After your blood test
Once the blood collection is complete:
- Please leave dressing strip in place for 3 hours.
- Avoid activities which may cause direct impact on the puncture site for 24 hours. If your skin is particularly thin, it may also be advisable to avoid activities which require energetic use of your arm (such as sports, digging or carrying heavy items) for 24 hours.
Your pathology report will be sent directly to your doctor. Please make an appointment with your doctor to discuss results.
Rarely, patients may experience some bleeding, swelling, discomfort or bruising. Should this occur the following steps are recommended:
Bleeding at needle puncture site:
- Apply firm pressure directly over the needle site and elevate the arm until bleeding stops.
Discomfort or swelling around needle puncture site:
- Elevate the arm and apply an ice pack to the site. This will help reduce bruising.
Excessive bruising:
- Rest the arm. Apply ice pack to the area.
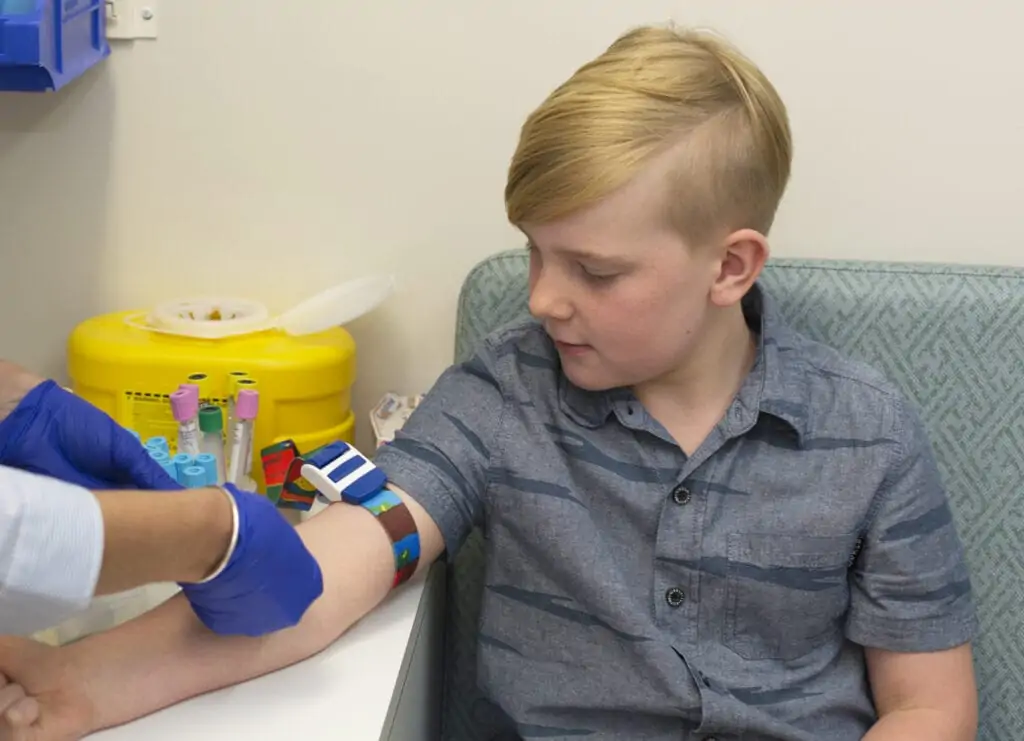
Pathology testing for children - Paediatric Collections
When taking your child for a blood test, it is a good idea to explain why the test is necessary, and exactly what is involved. Often bringing a favourite toy, book or colouring activity can help your child feel more comfortable.
Children over the age of 12 years can have their collection performed at any of our centres. For children aged from 1 to 12 years, we have specialised paediatric collection centres with collectors who have been trained in paediatric care.
To find one of these options – select “Paediatric Collection (0-12 months), (1-5 years), (6-12 years) from the “Any test” drop-down menu in the search criteria.
Please call the collection centre you plan to attend ahead of time and make an appointment.
Sometimes your child or baby may require a urine sample to be collected for testing. Please see Urine Collection (Paediatrics) below for further information.
Pre-test collection information
The following pre-test collection information will ensure the specimen you provide to Laverty Pathology is in the condition necessary for correct examination and accurate result reporting.
Your Doctor has asked for the following test to be performed.
Test Requirements:
- The monitor must be worn for a 24 hour period to ensure an accurate study.
- Whilst wearing the monitor you are not able to undertake the following: showering, bathing or water sports activities.
Instructions:
- To avoid incorrect results, you must relax and keep your arm still during a measurement until the cuff has completely deflated and the measurement has been taken.
- Avoid opening and closing the hand during the measurement and do not move the fingers.
- When the pressure in the cuff increases, you should: a. If standing: Let the arm hang loosely, place the hand in the trouser pocket or fingers in the waistband. b. If sitting: Rest the lower arm loosely on a table or other support.
- Ensure the hose from the Blood Pressure cuff does not become kinked.
- Before the pressure of the cuff is raised, a signal is given on each occasion throughout the day to warn you that a measurement is about to be taken.
- The “Event button” should be pressed at any time if you feel your blood pressure is raised.
- Press the “Day/Night” key, when going to bed at night and when getting up in the morning. The recorder will confirm the change with a signal.
- While sleeping, the unit must be placed on its side, so that the air tube cannot be kinked.
- Occasionally you may hear an audible beep from the monitor. This means that it was unable to take your blood pressure (usually arm movement). There is no cause for alarm; the monitor will retry to take your blood pressure again in about one minute.
- You must return to the Collection Centre to have the monitor removed as soon as the 24hrs have passed.
Paying for your BPM:
- You will be bulk billed for your ABPM for those meeting the Medicare criteria.
- If you are a Pensioner, Health Care Card holder or Non DVA Gold Card holder, please present your current card at the time of your service, as you are eligible for a discount.
- DVA Gold Card holders are exempt.
The 14C-Urea Breath Test is considered to be the ‘gold standard’ non-invasive diagnostic method for detection of the presence of current infection with H. pylori
in the stomach. The 14C-Urea Breath Test offers highly accurate and reliable diagnosis of H. pylori infection. It is also useful for post-treatment follow-up to demonstrate
H. pylori eradication.
The C14-PYtest measures the amount of the enzyme, urease, produced by H.pylori in the stomach by detecting the presence of the labelled carbon dioxide in the exhaled air.
Important Notes:
For pregnant/breastfeeding women and children under 10 years of age
Although the radiation dose is extremely small, the test has not been sufficiently trialled in children or pregnancy to recommend the test in these groups.
Please note that Laverty pathology offers faecal antigen detection as an alternative to the Urea breath test. Please discuss with your doctor the most suitable test for you.
Pre-Test Preparation
With consent from your doctor, stop the following medications:
- Antibiotics and bismuth-containing products 1 month prior to testing.
- Cyto-protective medicines, e.g., sucralfate, Carafate, Ulcyte, 2 weeks prior to testing
- Proton pump inhibitors 1 week prior to testing; e.g., Losec, Maxor, Nexium, Pariet, Somac, Zoton etc.
- You may continue taking antacids: e.g., Eno, Gastrogel, Gaviscon, Mylanta, Rennie, etc.
On the day of the test
You must not eat or drink for 6 hours prior to taking the test. This includes water.
You must not smoke for at least 2 hours prior to the test.
Drug Screening
Donor:
If you are required to have a legal drug screen, the preferred option is to go to a Laverty Pathology Accredited (AS/NZS 4308) Collection Centre. This will ensure that the collection procedures comply with the Australian Standard (AS/NZS 4308). Our Designated AS/NZS 4308 Collection Centres have been setup to facilitate sample collection according to the standard.
What is Expected?
Prior to testing, you will be required to:
- Make an Appointment with the nearest Laverty Pathology AS/NZS 4308 Collection Centre. (Some centres cease legal drug screens at earlier cut-off times than publicised opening hours).
- The Australian Standard (AS/NZS 4308) requires evidence of donor identity. To satisfy this requirement bring photo identification (i.e. Current drivers license, passport, employer photo ID. etc) The preferable collection appointment time is between 11:00am and 3:00pm. If you cannot provide photographic identification, we are unable to perform the collection unless your Requesting Authority can confirm your identity.
- On your arrival you will be asked what medication you are currently taking.
- You will then need to provide a urine sample under supervision.
Who do you Contact if you have any Questions?
Your first point of contact is your Requesting Authority. In many cases this will be your employer and their appointed delegate (often the Workplace Health & Safety Officer, Personnel Supervisor, Human Resources Manager or a General Practitioner can also request this test.) If they are unable to assist with your enquiry, they will usually contact our toxicologist and report back to you.
If not, you can call our Commercial Department who will assist you on (02) 9005 7090.
Please note: Out of pocket charge may apply.
Check with your requesting Authority.
Your Doctor has asked for the following test to be performed.
What to Expect:
An electrocardiogram (called an ECG) can be performed by our trained collectors.
You’ll be asked to lie on an examining table or bed. Electrodes will be attached to your arms, legs and chest. The electrodes are sticky patches applied with a gel to help detect and conduct the electrical currents of your heart. If you have hair on the parts of your body where the electrodes will be placed, the technician may need to shave the hair so that the electrodes stick properly.
A standard ECG takes just a few minutes.
The electrodes are then removed and you can resume normal activities. An ECG doesn’t involve medication or require recovery time. It is completely non-invasive, as the skin is in no way penetrated. The ECG is a safe procedure with no known risks. It does not send electric current into the body. On occasion, you may be allergic or sensitive to the electrodes causing local skin irritation.
When completed, the trace will be transmitted to our specialist cardiologists for interpretation and reported back to your treating doctor.
Paying for your ECG:
You will be bulk billed for your ECG if you are a:
- Pensioner
- Health care card holder
- DVA card holder
- Patient under the age of 18 years and over the age of 80
You will need to show your card to the collector at the time of the procedure to ensure you are bulk billed. If your card cannot be presented, you will receive an invoice in the mail.
Other patients will attract a fee, which is partially rebateable by Medicare.
Your Doctor has asked for the following test to be performed.
Instructions:
- You will need to make an appointment for this test.
- No preparation or fasting required.
- This test is performed on two separate days.
- Day 1 – A blood sample will be collected between 8:00am and 9:00am prior to taking the Dexamethasone tablets.
- You will be asked to take two Dexamethasone tablets, with 1 glass of water at 11:00 pm of Day 1.
- Day 2 – Return to the Collection Centre between 8:00 and 9:00 am to have a second blood sample collected.
- This completes the test.
Test Requirements:
- No specific dietary or medication restrictions necessary
- Menstruating patients should delay specimen collection until bleeding has completely stopped.
- Faeces samples must be collected for 3 consecutive days (or 3 different days) into a FOB special kit (green lid).
- Each sample tube MUST be labelled with the date and time of collection.
We supply you:
- Special kit -3 x FOB tubes (green lid)
- A large, clean plastic container e.g. Ice cream container
Collection Instructions:
- Label tube No 1 with your full name, date of birth, date & time of collection, test name.
- Line a clean large plastic container with aluminium foil and place into the toilet bowl.
- Wash hands.
- Pass the faeces into the plastic container.
- Unscrew the “green sampler cap” of the collection tube, and place it where it can be easily reached, taking care not to spill the liquid.
- Insert the stick end of the green cap into the faeces at least 5 times, each time in a different place.
- Return the stick back into the container tube and screw the cap tightly closed. * Shake the tube to mix the specimen with the transport liquid.
- All 3 collected specimens can be stored at room temperature (15-30°C).
- The tubes (3) MUST be delivered to the Collection Centre as soon as the collection is completed. DO NOT deliver samples one by one.
- Repeat steps 1-9 for the collection of samples 2 and 3. Ensure tubes are marked 2 & 3 respectively.
Requires one specimen only
We supply you:
- 1 x brown topped container
- 1 x specimen bag
- 1 x wooden spatula
- Instruction leaflet
Instructions:
- Label container with full name, date of birth, time and date of collection.
- Using the spatula provided, place a small amount of faeces (about the size of a 10 cent coin) into the container.
- Replace top, seal container and place in a specimen bag and send to the Collection Centre as soon as possible.
An appointment is required for this test. Please phone your nearest Laverty Pathology Collection Centre to make arrangements. Collection Centres and the test availability can be found here.
We recommend the following Pre-Test Preparation for Optimal Results:
- NO diet is required for pregnant patients. We suggest you eat the type of foods you normally eat.
- In non-pregnant patients, for the three (3) days before your test, you should eat “high carbohydrate” meals. We suggest you eat the type of foods you normally eat, but make sure that throughout the day you include in your diet all of the following foods:
• 1 serving of breakfast cereal, porridge or spaghetti
• AND 3 slices of bread or toast (or 1½ bread rolls)
• AND 3 servings of vegetables
• AND 3 pieces of fruit
• AND 1 medium potato or 1 serving of rice.
Children who are too small to be able to eat all of the above foods should eat whatever they can comfortably manage. - If you do not follow the diet, you will not be turned away, as it is more important that the test is performed. However, our clinic staff will be happy to re-schedule you if preferred.
- You are required to fast for eight hours prior to the test – which usually means an overnight fast.
- The maximum acceptable duration of a fast is fourteen hours – if the fast is longer than this, your referring doctor will be notified and consulted before the test is either rescheduled or carried out on the day.
- During a fast, you must have nothing to eat or drink, except for water. NO soft drinks, tea, milk, coffee or fruit juice may be taken during the fast.
- NO SMOKING on the day of the test and until the test is completed.
Information:
- On arrival at our Collection Centre, a blood sample will be taken from you by one of our trained collecting staff. You will then be asked to drink a sweet glucose drink and blood will be collected one and two hours later.
- Please note that you will be required to remain in the Collection Centre for the duration of the test. We suggest you bring a book to read to help pass the time.
Important: While on the 3-day high carbohydrate preparation, if you should become very unwell, or notice that you are losing weight, feeling drowsy, very thirsty and are passing large amounts of urine, please contact your referring doctor immediately.
Preparation:
- Make an appointment to have your Holter Monitor fitted by your nearest participating Collection Centre.
- You should shower/bath before this appointment. You can’t get the monitor wet or remove the monitor to shower/bath once the monitoring begins.
- Please make sure you wear loose fitting clothes on the day of your appointment and during the testing period. This is required because electrodes will be attached to your chest.
Procedure:
- Our technician will place some electrodes that sense your heartbeat on your chest. The electrodes are attached to your chest through tape-like adhesive and gel. For males, a small amount of hair may be shaved to make sure the electrodes stick. The technician connects the electrodes to a recording device with several wires and will instruct you on how to properly wear the recording device.
- You will be asked to record the timing of any events – symptoms of palpitations, skipped heartbeats, shortness of breath, chest pain or lightheadedness – in a diary that the collector gives you. When entering the symptoms in the diary also press the event button on the monitor.
- Once your monitor is fitted and you’ve received instructions on how to wear it, you will leave our centre and resume your normal everyday activities. Do not participate in strenuous activities.
- Once your monitoring begins, don’t take the Holter Monitor off — you must wear it at all times, even while you sleep.
After the Procedure:
- Our Collector will then remove the electrodes from your chest, (similar to a bandage being pulled off your skin).
- Our cardiologists will review the holter monitor trace and will report the results back to your treating doctor.
Once your monitoring period is over, you’ll need to come back to our collection room to return the Holter Monitor and diary.
Diet:
At least one day prior to and whilst collecting the specimen.
DO NOT EAT OR DRINK any of the following:
| Fruit | Vegetables | Nuts/Seeds |
|---|---|---|
|
Pineapple Citrus Fruits Dried Fruits Jams Bananas Plums Tropical Fruits |
Avocado Broad Beans Broccoli Brussel Sprouts Cauliflower Eggplant Tomatoes |
All (including peanut butter and tahini) |
| Cocoa | Dairy | Condiments |
|---|---|---|
|
Chocolate Cocoa Milo |
Cheese Flavoured Milk Smoothies Yoghurt |
Mayonnaise Pickles Sauerkraut Vinegar |
| Meats | Fermented Foods | Other |
|---|---|---|
|
Gravy Processed Meats Seafood (including canned) |
Soy Sauce Vegemite |
Alcohol Walnuts |
Drugs:
Please list all medication (even over the counter preparations) currently being taken.
Special Requirements:
- Delayed examination may lead to invalid test results and a repeat test required.
- The specimen must be delivered to the laboratory (within 45 mins), as it must be examined within 1 hour of collection – follow the link below for locations and hours of operation.
We supply you:
- 1x White top Container.
Please follow these instructions:
- The specimen is to be collected between 2 and 7 days after your last ejaculation.
- DO NOT use condoms, artificial lubricants, talcs, etc., as these will interfere with the test results.
- Label the container with your surname and given name, date of birth, date and time of collection and test name.
- Collect the ENTIRE sample in the container provided by means of masturbation. Other methods, such as interruption of intercourse, are not suitable as there can be a loss of the first portion of the specimen. Place specimen into the specimen bag with the request form.
- DO NOT expose the container to extremes of temperature before or after specimen collection.
- During transport to the Laboratory, the sample should be kept between 20°c and 37°c. This is best achieved by keeping the sample next to your body during transport.
- Do not refrigerate specimen or allow the specimen temperature to rise above body temperature. Please Note: This test incurs an out of pocket expense. For details please ask your pathology collector
- Inform reception that you have an urgent time critical specimen.
Special Requirements:
- Prior to collecting specimen, please contact your nearest Collection Centre to arrange the best time and place to deliver the specimen. Collection centres and the test availability can be found here (Not all Collection Centres accept Semen).
- The sample must reach the Testing laboratory within 3 hours.
- Repeat Test: Sample MUST reach the Testing Laboratory within ONE hour of collection.
We supply you:
- 1x White top Container.
Please follow these instructions:
- The first specimen after the procedure is to be collected at three months and after at least 20 ejaculations. Subsequent specimens, if required, are to be collected as per your doctor’s instructions.
- Do not use condoms, artificial lubricants, talcs etc., as these will interfere with the test results.
- Label the container with your surname and given name, date of birth, time of collection and test name.
- Collect the ENTIRE sample in the container provided by means of masturbation. Other methods, such as interruption of intercourse, are not suitable as there can be a loss of the first portion of the specimen.
- Place lid on container & tighten firmly to prevent leakage. Avoid cross threading.
- DO NOT expose the container to extremes of temperature before or after specimen collection.
- During transport to the Collection Centre, the sample should be kept between 20°c and 37°c. This is best achieved by keeping the sample next to your body during transport.
- DO NOT refrigerate specimen or allow the specimen temperature to rise above body temperature.
Your Doctor has asked for the following test(s) to be performed.
Instructions:
- The preferred time of collection is in the morning prior to eating, drinking and smoking.
- Sputum from lungs is required. Saliva (e.g. spit) from the mouth or throat is NOT suitable for testing.
- If 3 specimens are required, specimens must be collected and delivered to the Collection Centre on each day of collection.
Materials we supply:
- White Top Container (1or 3 as instructed)
- Specimen Bag per sample
If at home, it may be useful to arrange pillows over the side of a bed and lie on them head downwards for about 10 minutes to drain the sputum from the lungs. The most adequate sample may be obtained early in the morning on rising.
Procedure:
- Label container number 1, (2 & 3 if required) with your full name, date of birth, date and time of collection, and test name.
- Rinse your mouth with water. For patients with dentures, please remove the dentures first.
- A deep cough is needed to produce sputum sample directly into the container.
- Place the lid on the container and tighten the lid firmly to prevent leakage. Avoid cross threading the lid.
- Specimen MUST be delivered to the Collection Centre on day of collection. If there is a delay specimen should be refrigerated.
- If 3 specimens are required, please repeat steps 1-5 for the collection of samples 2 and 3. Ensure containers are marked 2 & 3 respectively on the lids.
- Please wash your hands after this procedure.
Urine Testing
Your doctor has requested that you provide one specimen or three consecutive mid-morning, mid-stream urine specimens.
Instructions:
- No specific dietary or medication restrictions necessary. Ensure you are well hydrated.
- The first urine specimen of the day is not suitable for this test.
- A mid-morning, mid-stream urine sample should be collected.
- If 3 x urine samples requested, these must be collected on 3 consecutive days. Each sample MUST be marked day 1, 2 and 3 retrospectively.
- Each sample is to be delivered to the Collection Centre each day. DO NOT deliver all 3 samples together.
Materials we supply:
- Yellow top container/s – as per Request Form instructions
- Specimen Bags
Procedure:
First sample:
- Label the container with your full name, date of birth, date and time of collection and test name.
- Remove the lid from the urine container and avoid contamination of the inside of the container or lid. Note: Females – separate the labia (skin folds). Male – retract foreskin if uncircumcised.
- Pass an initial amount of urine into the toilet and then pass the container under and collect a minimum of 30mls (fill the jar 3/4 full) of urine, in the container.
- Place the lid on the container and tighten the lid firmly to prevent leakage. Avoid cross threading of the lid, and insert into the Specimen Bag.
- Return the sample to the Collection Centre on the day of collection.
If there is any delay, refrigerate the specimen.
Important Notice:
Repeat steps 1-5 for the collection of the samples 2 and 3 if required. Ensure containers are marked 2 & 3 respectively on the lid.
We supply you:
- 1 x Paediatric urine bag.
- 1 x Yellow top container.
Procedure:
- Label container with the baby’s full name, date of birth, date and time of specimen collection, test name.
- Wash your hands.
- Remove the baby’s nappy.
- Wash the genital area thoroughly with soap and water. Dry thoroughly.
- Open the urine collection pack.
- Remove the keyhole shaped opening on the urine bag without touching the inside of the bag.
- Remove the adhesive protector.
- Apply the bag over the urethral opening.
- After the urine has been passed, carefully remove the bag.
- With scissors, snip the corner of the bag and pour the urine into the yellow top container.
- Place the lid on the container and tighten the lid firmly to prevent leakage. Avoid cross threading the lid.
- Return the sample to the Collection Centre as soon as possible on the day of collection. If there is any delay, refrigerate the specimen.
- Wash your hands and any scissors after this procedure.
Your doctor requires you to collect a First Void Urine sample for a PCR test for Chlamydia trachomatis, Neisseria gonorrhoea, Trichomonas vaginalis and / or Mycoplasma genitalium.
Instructions:
- Please ensure you have not passed urine for at least 1 hour prior to collection of the sample.
We supply you:
- 1 x Green top container.
Procedure:
- Label the container with your full name, date of birth, date and time of collection.
Where the label reads “Specimen of” write for example ‘Chlamydia First Void Urine.’ - Wash hands.
- Remove the lid from the urine container and place it where it can be easily reached.
Avoid contamination of the inside of the container or lid.
Pass the first 30-40ml (fill the jar 3/4 full) of urine into the container provided. - Pass any additional urine in the toilet.
- Place the lid on the container and tighten the lid firmly to prevent leakage. Avoid cross threading.
- Return the sample to the Collection Centre on the day of collection.
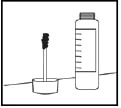
We supply you:
- 1 x Urine Collection Container.
Procedure:
Collect ALL urine produced within an 8 hour period.
- We strongly advise that you avoid the contents of the container and suggest that you collect your urine into another container (e.g. clean ice cream container) and then pour into the urine container.
- Empty your bladder into the toilet just before bedtime and record the time eg. 10:00pm and date on the container provided.
- Collect all subsequent urine samples into the container, up to and including the final specimen, which is to be collected 8 hrs. later e.g. Next morning, empty bladder into the bottle. This will complete the collection.
- Place the lid on the container and tighten the lid firmly to prevent leakage. Avoid cross threading.
- Record the starting and finishing date and time of collection on the container.
- The container should be kept in a cool place during collection.
- Bring the container to the Collection Centre within 4 hours of finishing the collection.
Please note that if any urine is accidentally lost/spilt you must notify the collector when returning the sample.
Please telephone the Chemical Pathologist on 02 9005 7000 if you are uncertain about any of these instructions.
It is essential that urine specimens are carefully collected for accurate laboratory results. Please follow the instructions exactly. If you are unsure how to collect the specimen, ask our staff to explain.
We supply you:
- 1 x Urine Collection Container
Procedure:
Collect ALL urine produced within a 24 hour period.
- We strongly advise that you avoid the contents of the container and suggest that you collect your urine into another container (e.g. clean ice cream container) and then pour into the urine container.
- Empty your bladder into the toilet soon after getting out of bed in the morning and record the time (e.g. 6:00 am) and date on the container.
- Collect all further urine samples into the container, up to and including the final specimen, which is to be collected 24 hrs. later e.g. Next morning, empty bladder into the bottle. This will complete the collection.
- Place the lid on the container and tighten the lid firmly to prevent leakage. Avoid cross threading.
- Record the starting and finishing date and time of collection on the container.
- The container should be kept in a cool place during collection.
- Bring container to the Collection Centre within 4 hours of finishing the collection.
Please note that if any urine is accidentally lost/spilt you must notify the collector when returning the sample. Please telephone the Chemical Pathologist on 02 9005 7000 if you are uncertain about any of these instructions.
SEARCH OVER 550 LOCATIONS ACROSS NEW SOUTH WALES